我們在開發資料庫相關的網站的時候,通常會用到許多資料表,而且這些資料表之間彼此都有關連性,接著我們就來看看在Django的Model要怎麼實作。
我們現在再來新增一個App:
> python manage.py startapp book
book/models.py的內容長得像這樣:
1
2
3
4
5
6
7
8
9
10
11
12
13
14
15
16
17
18
from django.db import models
from author.models import Profile
from django.contrib import admin
class Book ( models . Model ):
title = models . CharField ( max_length = 150 )
page = models . IntegerField ()
price = models . IntegerField ()
author = models . ForeignKey ( Profile )
publish_date = models . DateField ()
class Meta ( object ):
db_table = "book"
class BookAdmin ( admin . ModelAdmin ):
pass
admin . site . register ( Book , BookAdmin )
這裡用到了ForeignKey,對應到了我們之前建的Profile類別,表示這本書的作者資料是指向profile的某一筆資料,書對作者來說是一個一對一的關係,但是一個作者可能會寫多本書,作者對書來說就是多對一的關係(雖然現實上一本書可能有超過一個以上的作者,不過我們就把它單純化,讓生活暫時美好一下..)
別忘了把book這個App也設定到settings.py的INSTALLED_APP:
1
2
3
4
5
6
7
8
9
10
11
12
13
14
INSTALLED_APPS = (
'django.contrib.auth' ,
'django.contrib.contenttypes' ,
'django.contrib.sessions' ,
'django.contrib.sites' ,
'django.contrib.messages' ,
'django.contrib.staticfiles' ,
# Uncomment the next line to enable the admin:
'django.contrib.admin' ,
# Uncomment the next line to enable admin documentation:
# 'django.contrib.admindocs',
'author' ,
'book' ,
)
執行python manage.py sql book,看一下它轉換出來的SQL語法:
1
2
3
4
5
6
7
8
9
10
11
BEGIN ;
CREATE TABLE "book" (
"id" integer NOT NULL PRIMARY KEY ,
"title" varchar ( 150 ) NOT NULL ,
"page" integer NOT NULL ,
"price" integer NOT NULL ,
"author_id" integer NOT NULL REFERENCES "profile" ( "id" ),
"publish_date" date NOT NULL
)
;
COMMIT ;
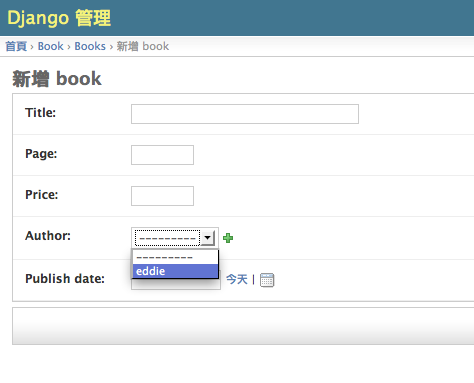
執行python manage.py syncdb,把這個Book類別也轉成資料表。因為我們剛才也把Book類別也註冊到Admin模組了,所以我們到後台也可以看得到它。你可以在新增Book資料時候發現它的Author欄位在後台變成下拉選單了:
方便吧 :)
Model其實還有很多東西可以介紹的,不過因為我們的目的是為了快速看過一遍Django這個web framework大概是怎麼回事,所以細節還請各位參考官網文件 (一定要看!!)。